Titel : CSS Basics. How to Apply Rounded Corners On Images #1
Link : CSS Basics. How to Apply Rounded Corners On Images #1
CSS Basics. How to Apply Rounded Corners On Images #1
This tutorial will explain how to change the outside border of any image by using some simple CSS rules to make it round, but this is so easy doing this, that I'm finally going to make this post for other purposes.
The trick today that I'm going to publish in two parts is to help you to understand, at least, a little of what CSS (Cascading Style Sheets) is.
For those who would like to learn more, please take a look at this link and for those who really want to learn thoroughly, I recommend to visit this site.
Introduction and terminology
Style sheets aim to help sort out what is the structure of a website and which is its format or appearance. So, the CSS box model is, basically, a box that wraps around HTML elements, and determines how those boxes are presented in terms of colors, fonts, width, backgrounds etc.
The advantage is that, anytime we decide to change something, we don't have to change all the pages one by one, but simply, change the properties from the style sheet and these modifications will automatically apply in all the pages.
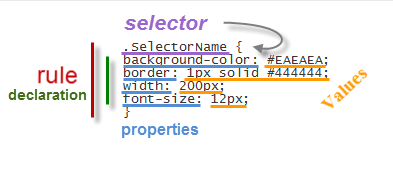
The style sheet is a set of rules made of selectors and declarations. The selector is to be used as a nickname or name of what you want to configure from the style sheet and apply to the HTML, and declarations are properties to which we add the desired values (more information on CSS syntax)
Adding the CSS selector
If we add, for example, the code above in our style sheet, we might not see anything particular happening in our website. As I have mentioned above, the selector relates to the HTML and CSS so, if we want a box to take these values for width, background color, border and font size, we need to include the selector within the HTML of a page element, like this:
<div class="SelectorName">Text here</div>Here we added a rule telling the browser to interpret that this box has to be of a certain type or class. This class or selector could have some specific properties and values defined in the style sheet, as you can see in the image above.
Now let's see how this will change the look of the box, while all others that don't have the SelectorName name will follow the standard appearance.
Basically, when we add a rule in a style sheet, or modify an existing one, what happens is that all boxes marked with that selector will change their appearance according to the properties and values that we have defined in the style sheet.
Where to add the CSS style
This style can be added in external CSS files - create the CSS file with all the rules, upload it on a hosting site and get the URL of the file. To make use of it, include the following line in the header of your template. For Blogger, you can add it between <head> and <b:skin><![CDATA[/*:
<link href="syle.css" rel="stylesheet" type="text/css"/>Note: replace the text in blue with the url of the CSS file.
You can also add the style directly in the HTML of the template by adding the CSS between the style tags:
<style>This can be added in the HTML of a page element as well. In this case, you don't need to add any selector to indicate where the CSS style is:
.SelectorName {
background-color: #EAEAEA;
border: 1px solid #444444;
width: 200px;
font-size: 12px;
}
</style>
<div style="background-color: #EAEAEA; border: 1px solid #444444; width: 200px; font-size: 12px;">Text here</div>In Blogger, the rules are between the <b:skin><![CDATA[/* and ]]></b:skin> skin tags. If we access the HTML of our template, we will find a bunch of codes in between these tags, which is actually the CSS styling that defines the appearance of our blog.
For those who don't want to touch the template code, we can add the CSS directly by going to the Blogger Template designer > Advanced > Add CSS.
That's enough for today. In the next tutorial we'll get to know how to add rounded corners to our images using CSS -> how to set a rounded borders around an image using CSS.
Thus Article CSS Basics. How to Apply Rounded Corners On Images #1
Helpful Tips CSS Basics. How to Apply Rounded Corners On Images #1,hopefully can provide benefits to all of you . Okay , so this time posting helpful tips.


0 Response to "CSS Basics. How to Apply Rounded Corners On Images #1"
Post a Comment